
Incorporating isometric ab exercises into your current gym routine is a great way to change your body shape and build that figure you’ve always dreamed about. Working the core correctly is essential to any workout, and it also goes a long way in helping you in every avenue of life. Training your core is an easily overlooked part of training. People assume that because your core is used in other exercises, especially according to those pictures printed onto the side of the weight machines, you don’t need to do anything else.
Isometric ab exercises are not about showing off. You’re not looking to perform a hundred reps with more weights than the person next to you. The isometric element of the exercise means you hold a single position for as long as you can. Isometric ab exercises place a different manner of stress on your muscles, which is why they are so important.
Contents
What are isometric ab exercises?
Isometric ab exercises are static poses that are all about maintaining tension. The standard exercises you think of in the gym are movement-based and rep-driven. These are called dynamic exercises. When doing an isometric exercise, one position is held for a specific amount of time, during which your muscle/s are continuously under tension.
Isometric ab exercises are different from, but not better than, dynamic exercises. Ideally, you should perform a combination of the two types of exercises throughout your weekly workout regime.
Research has shown that isometric training can be beneficial in producing strength gains. The static nature of isometric exercises can be especially useful to those who have a limited range of movement, as they only need to be in a single position.
There are ten great isometric ab exercises that you should add to your workout routine.
- Pillar hold
- Plank
- Side plank
- L-sit
- V-hold
- Dead bug hold
- Half dead bug pose
- Warrior III
- Bear crawl hold
- Pallof hold
Maintaining the correct form while doing isometric core exercises is equally vital, as not only does poor form reduce the effectiveness of the move, but it also increases the chance of injury, particularly in your lower back.
Top 10 Isometric Ab Exercises
Below are the ten best isometric ab exercises guaranteed to add an extra dimension alongside other workouts that engage the abs. Remember, correct form is more important than duration with these core exercises.
1. Pillar Hold

Instructions:
- Go into the top of a push-up position with your palms flat on the floor and your arms fully extended.
- Your hands should be shoulder-width apart and you should have a straight line from your head to your heels.
- Push up into your shoulder blades, protracting your scapular. Squeeze your glutes and tuck your pelvis under.
- Hold for 30+ seconds.
2. Plank
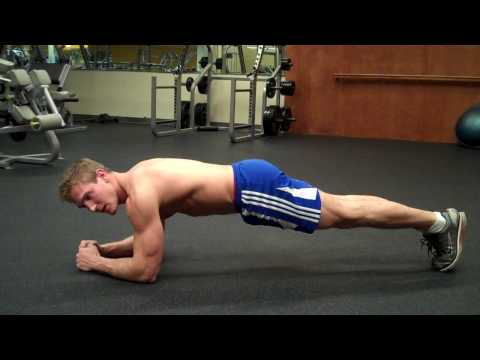
Instructions:
- Have your forearms on the ground, shoulder width apart and your feet on the floor.
- Push up onto your elbows so that your body is off the ground with only your forearms and toes on the floor.
- You should have a straight line from your head to your heels and your shoulders should be directly above your elbows.
- Keep your glutes activated to assist you in maintaining a safe position for your lower back (your hips shouldn’t be in the air or sagging downwards).
- Hold for 30+ seconds.
3. Side Plank
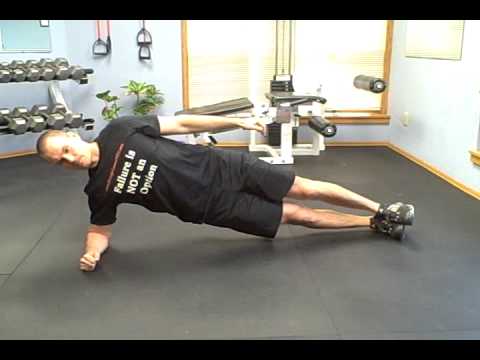
Instructions:
- Lie on your side with your legs stacked and your upper body propped up on your elbow.
- Push your hips up so that only your elbow, forearm and foot of your bottom leg are on the ground.
- You should have a straight line from your head and top shoulder to your top foot.
- Your shoulder should be in line with your supporting elbow.
- Hold for 20+ seconds on each side.
4. L-Sit

Instructions:
- You can do this on dip bars or on the floor. A good starting point for learning this exercise would be to do it on the dip bars.
- Start with a hand on each dip bar and support your body weight on fully extended arms, straight down by your side. Your body should be hanging in a straight line to begin with.
- Keeping your legs straight, raise them to be parallel to the ground. If the straight leg version is too challenging, try it with your knees bent, keeping them shoulder width apart, i.e. lift your knees instead of your straightened legs.
- Extend through your chest and try to send your hips forward.
- Hold for 15+ seconds.
Read more: 9 Killer Captain’s Chair Exercises (That Will Set Your Core on Fire)
5. V-Hold
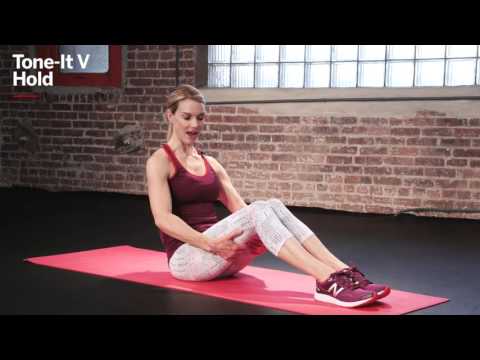
Instructions:
- Start by sitting on the ground with your knees bent and feet flat on the floor.
- Lift your feet off the ground and roll back onto your tailbone.
- Maintaining a neutral spine, extend your legs and your arms until they are straight and are running parallel to each other.
- Your torso and legs should create a ‘V’ shape.
- Hold for 20+ seconds.
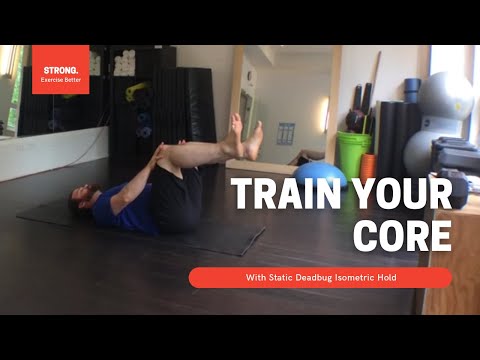
6. Dead Bug Hold
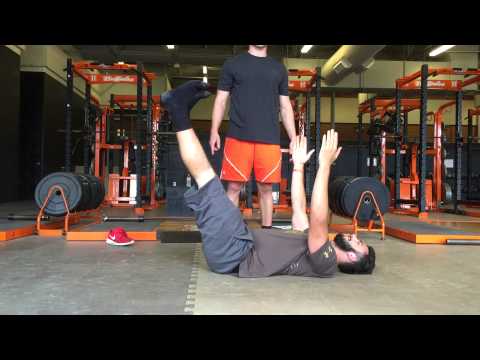
Instructions:
- Lie on your back and raise your legs and arms straight up in the air. Your legs should be hip width apart and your arms shoulder width apart, both fully extended.
- From here, scoop your lower abs by tilting your pelvis inwards, removing any arch from your lower back and flattening your spine against the ground.
- Draw your belly button into your spine.
- Lower your legs towards the ground, as far as you can maintain a spine flat against the ground.
- Hold for 60+ seconds.
7. Half Dead Bug Hold
Instructions:
- Lie on your back and raise your legs and arms.
- Bend your legs at the knees and have them hip width apart with a 90-degree bend at your hips and knees.
- Place a palm on the top of each thigh.
- Flatten your spine against the mat, then gently push your palms into your knees, creating tension for you to resist against.
- Hold for 30+ seconds.
8. Warrior III Pose
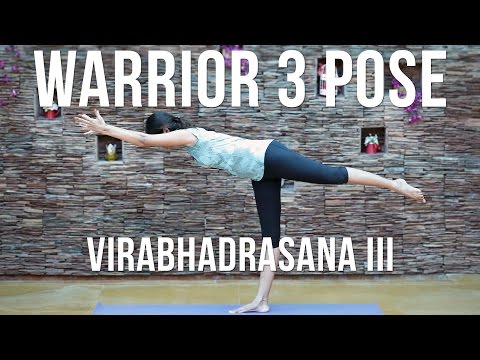
Instructions:
- Stand in a split stance (one leg forward, one back).
- Shift your weight onto your front foot sending your back foot onto its toes.
- Your arms should be by your sides with a slight bend in your elbows to begin with.
- Maintaining a small bend in the front knee and your weight concentrated in the heel of your front foot, slowly hinge forward at the hips, shifting all your weight into your front foot and lifting your back foot and leg off the ground.
- Note, your back leg should only lift as far as your hip hinge/your chest goes down, so your body remains in a straight line from your head to your back foot.
- Once your body is parallel to the ground and you are in a stable and secure position, extend your arms forward, reaching in front of you.
- Hold for 15+ seconds on each side.
9. Bear Crawl Hold

Instructions:
- Go onto your hands and knees on the floor.
- Your knees should be hip width apart, directly under your hips.
- Your arms should be shoulder width apart with your hands on the floor directly under your shoulders.
- Keeping your back straight and your lower abdominals engaged, lift your knees an inch or so off the ground.
- Hold for 30+ seconds.
10. Pallof Hold

Instructions:
- Attach a single handle to the cable machine at shoulder height.
- Grab the handle between two hands and take a few steps out from the cable machine.
- Press the cable out in front of you until your arms are fully extended.
- Resist being pulled towards the cable machine by bracing your core and squeezing your glutes.
- Hold for 15+ seconds on each side.
Final Words
Incorporating isometric ab exercises into your workout routine is the perfect way to breathe a fresh charge into your workouts. A great time to do your isometric ab exercises is at the end of your workout when your muscles are already tired. That is when these isometric exercises really shine and help carve out those abs you have always wanted.
Remember you should not build an entire workout of solely isometric ab exercises. Every now and then is ok. A little supplemental workout here and there, but by and large, you should sprinkle some of these exercises into all of your current workouts.