
Planks should prevent back pain, so why does it hurt your back when you do them?
There are three explanations of why your back hurts during planks. You don’t have good technique, you aren’t strong enough, or you are holding the plank for too long.
I will provide instructions on how to do a plank correctly. I will then discuss how you can use modifications and shorter timed planks to get better results.
Keep reading to learn how you can use planks to build core strength without back pain.
Contents
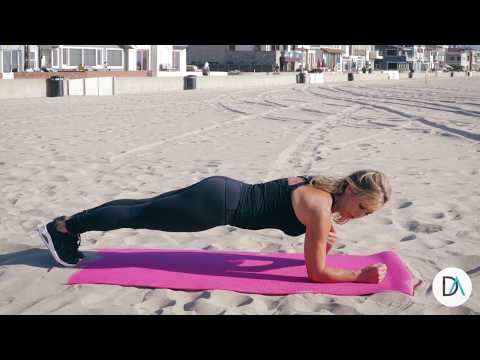
Plank with good form
Bad form is the number one cause of back pain during planks. It’s impossible to activate your abdominal muscles when your body isn’t in the right position. If your abs aren’t engaged, you will stress your low back, shoulders, and neck.
Follow these guidelines to execute a perfect plank.
Position your upper body correctly
Stack your shoulders directly over your wrists or elbows. Your arms should be perpendicular to the floor.
Press your hands into the ground to activate your shoulders. Your shoulder blades should be drawn down away from your spine and not scrunched together.
Tighten up your lower body
Your legs and feet should be touching during a plank.
During a plank, your glutes and quads should be flexing to create a tight lower body. It’s much harder for your core to support relaxed legs.
Don’t let your hips and stomach sag
Sagging is the most common fault while planking, and it is why your back hurts when you do planks. When your abs are relaxed, your stomach sinks toward the floor, and your lower back arches.
If you feel your back pinch when you do a plank, it means you are relying on your vertebrae pressing together to hold you up, not your abdominal muscles.
Keep your back neutral by engaging your transverse abdominis – your deep abdominal muscles. Lift your stomach away from the floor without moving your back.
Don’t pike your hips
Lifting your stomach doesn’t mean your hips go up too. By engaging your abs and squeezing your glutes, you will create a tight and stable low back position.
Keep your head neutral
The goal is to create a straight line from your heels through your head. Don’t let your head dangle to the floor, which can lead to a rounded upper back. Don’t stick your head up, creating a kink in your neck.
Your gaze should be focused on the floor slightly in front of you.
Breathe normally.
Don’t forget to breathe! Take normal, steady breaths during your plank. Your muscles need oxygen.
Modify your plank to build strength
If you tried following the instructions for proper form on the plank and couldn’t hold it for more than a couple of seconds, you probably aren’t strong enough.
Try one of these modified planks to build the strength necessary to perform a traditional plank.
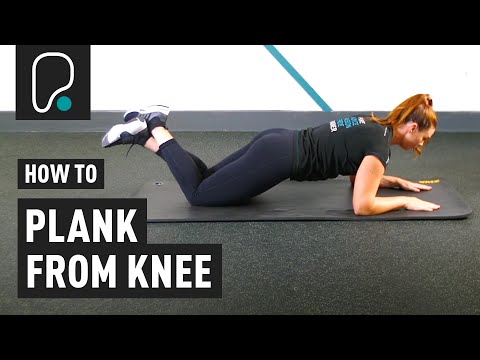
Kneeling plank
A kneeling plank is similar to a regular plank. The difference is that your knees are on the ground instead of your toes. Your core does not have to work as hard to support your entire body weight with a kneeling plank.
How to:
- Stack your shoulders directly over your elbows with forearms resting on the ground.
- Press your forearms into the ground to activate your shoulders and keep them from slumping into your shoulders.
- Bring your knees together on the floor.
- Engage your abs and squeeze your glutes.
- Focus your gaze on the floor in front of you.
- Hold the position for as long as you can with good form.
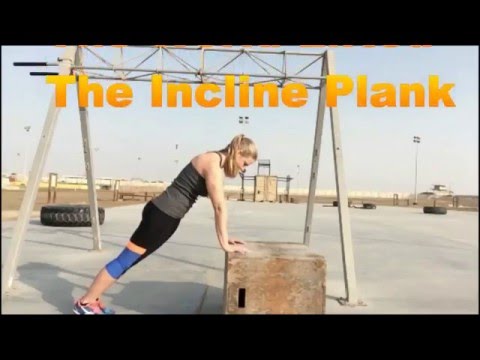
Incline plank
Your feet will be on the ground during an incline plank, but your hands will be on an elevated surface like a box or weight bench.
How to:
- Place your hands on the edge of a box or weight bench.
- Stack your shoulders directly over your wrists.
- Step your feet out far enough to create a straight line from your heels to your head.
- Pull your abdominals toward your spine.
- Squeeze your glutes and quads to make your lower body straight and rigid.
- Focus your gaze slightly in front of your hands.
- Hold the position as long as you can with good form.
Either of these exercise modifications will help maintain good form and avoid back pain during planks. Once these variations feel comfortable, you will be ready to attempt traditional planks.
Plank for less time to stop having back pain
Planks are only beneficial as long as you can keep good form. Even if you start your plank in a good position, back pain can occur if you hold it for too long.
Reminding yourself to regain a good position can correct the problem for a moment. Still, once the muscles are entirely fatigued, the best thing to do is rest and attempt the exercise again once you have recovered.
Break it up into shorter segments
Accumulate 180 seconds in a plank Instead of doing three 60 second planks. You can break the time into as many segments as you need to accumulate the total goal time with good form.
You are no longer using your core muscles when your form deteriorates. Holding a plank with a sagging back to finish the minute isn’t helping you get stronger, and it could cause your back to hurt.
Do five sets for as long as possible
With this strategy, you do five planks as long as possible with good form. Rest a few minutes between attempts.
You can track your progress by keeping track of how much total time you accumulate over those five planks.
Again, you must be only counting the amount of time your plank had good form.
Doing planks with a friend who can tell you when your form is off is useful to make sure you are doing the exercise correctly.
Plank back pain: Conclusion
Planks are a great core exercise, and you can do them without hurting your back.
The key to safely doing planks is to focus on your form. If you aren’t strong enough, try the modified planks I showed you to avoid back pain when planking, and remember to apply our unique tips to avoid muscle fatigue.